Use arrow keys to navigate through slides. Press Space or Enter to pause autoplay.
Powerful VPS Servers
Full control, flexible configuration, and high-performance environment for your projects
VPS plans
Lag-free Minecraft Hosting
Play with friends on your own server - high stability, complete freedom of settings.
Minecraft plans
Dedicated Servers
Rent a full-fledged server - maximum resources, no compromises or limitations.
Dedicated plans
Reliable Web Hosting
Launch your website in minutes - fast, stable, with 24/7 support
Web Hosting plans
How to transfer files between Windows Server (or VPS) and your local computer
If you're running Windows Server – on a VPS or a dedicated server – there are two reliable ways to move files to and from your own computer. The first takes about thirty seconds to set up and is ideal for everyday use. The second takes a few minutes and is the better choice for large or frequent transfers.
Both methods work on Windows Server 2019, 2022, and 2025, on VPS and dedicated plans alike, and whether your own computer runs Windows or macOS. Each section below covers both.
Method 1: Remote Desktop Drive Redirection
Remote Desktop can share the drives on your local computer with your server, so both appear side by side in File Explorer. Copying files is then just drag and drop.
Setting it up on Windows
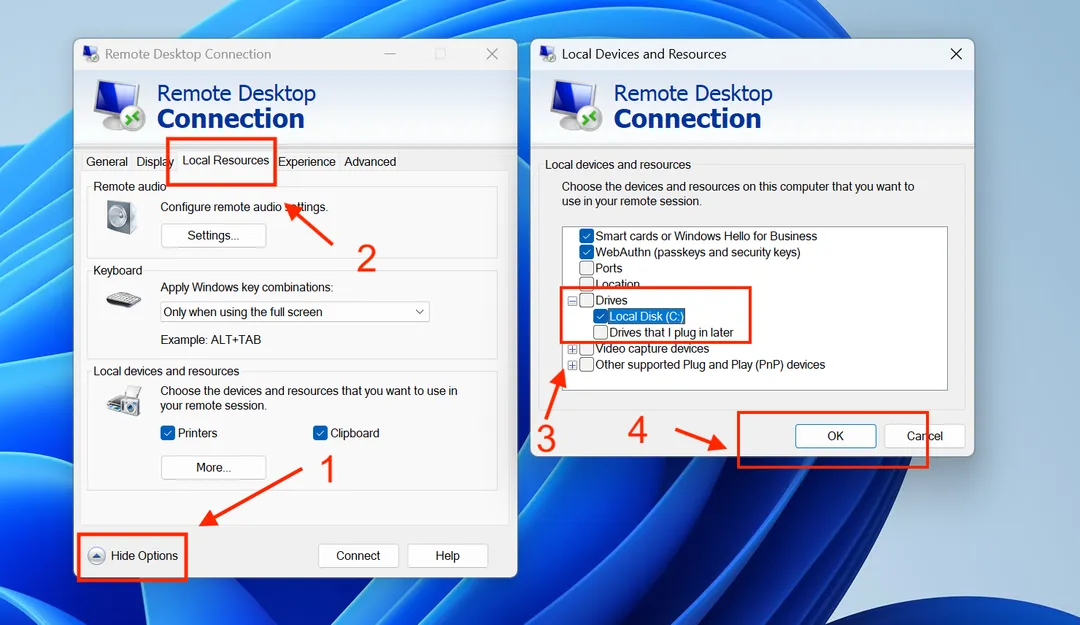
- Open Remote Desktop Connection on your computer (press
Win + R, typemstsc, press Enter). - Click Show Options in the bottom-left corner.
- Go to the Local Resources tab.
- Under Local devices and resources, click More....
- Expand Drives and check the drive or folder you want the server to see. Selecting your
C:drive shares your whole computer, so most people prefer to check just one drive or a specific folder. - Click OK, then connect to your server as usual.
Setting it up on a Mac
macOS doesn't include a Remote Desktop client, so you'll need Microsoft's free Windows App from the Mac App Store. If you already have Microsoft Remote Desktop installed, that's the same application under its former name and it works identically.
The Mac client shares individual folders rather than whole drives:
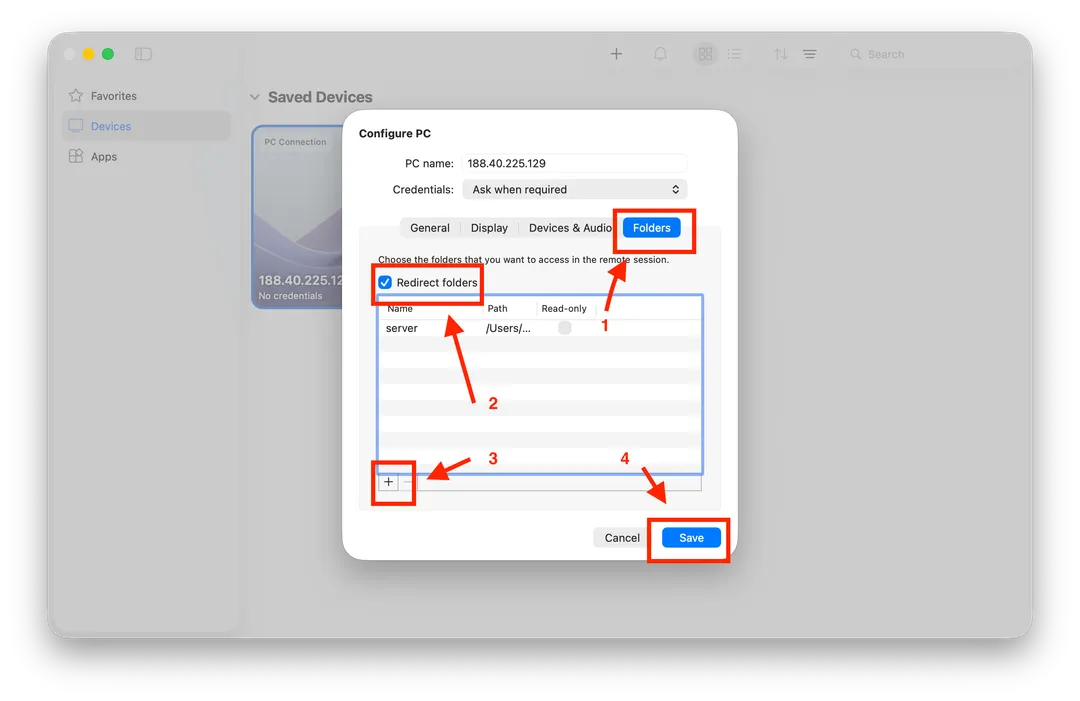
- Open Windows App.
- Right-click your saved server and choose Configure, or click + → Add PC if you haven't set it up yet.
- Open the Folders tab.
- Check Redirect folders, then click + and choose a folder on your Mac. You can add more than one.
- Save, then connect to your server.
A shared folder on your Desktop makes a convenient drop point for transfers in both directions.
Using it
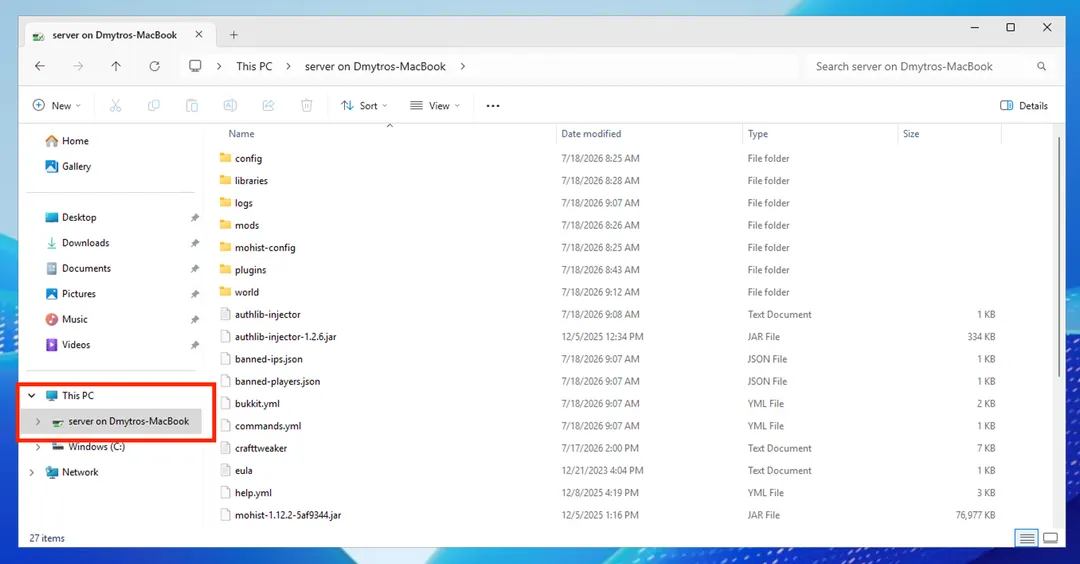
Once you're connected, open File Explorer on the server and look under This PC. Your shared drives or folders appear near the bottom under Redirected drives and folders, labelled with your computer's name. Copy and paste, or drag and drop, in either direction.
On Windows, you can also copy a file on one machine with Ctrl + C and paste it on the other with Ctrl + V. Clipboard file copying is less dependable from a Mac, so drag files into your redirected folder instead.
Good to know
- The setting is remembered for that connection, so you only configure it once.
- Transfers run over the Remote Desktop session itself, which makes them noticeably slower than a dedicated transfer method.
Method 2: SFTP over SSH
Windows Server includes an OpenSSH server as a built-in optional feature. Enabling it lets you connect with a proper file transfer client, which is faster, resumable, and works without an active Remote Desktop session.
Step 1: Enable the OpenSSH Server
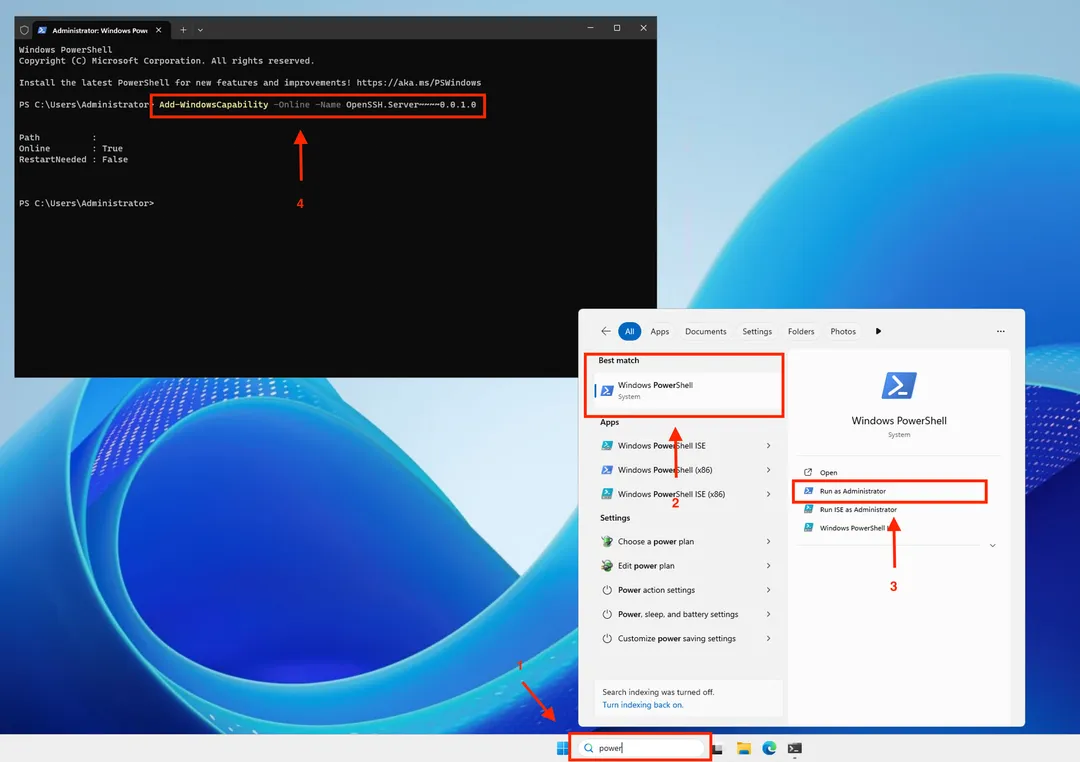
Connect to your server via Remote Desktop, open PowerShell as Administrator, and run:
Add-WindowsCapability -Online -Name OpenSSH.Server~~~~0.0.1.0This same command works on Server 2019, 2022, and 2025. On Server 2019 the bundled OpenSSH build is a few versions behind; that's fine for file transfers, but if you need the latest release you can install it from the official OpenSSH for Windows project on GitHub instead.
Step 2: Start the service and set it to run automatically
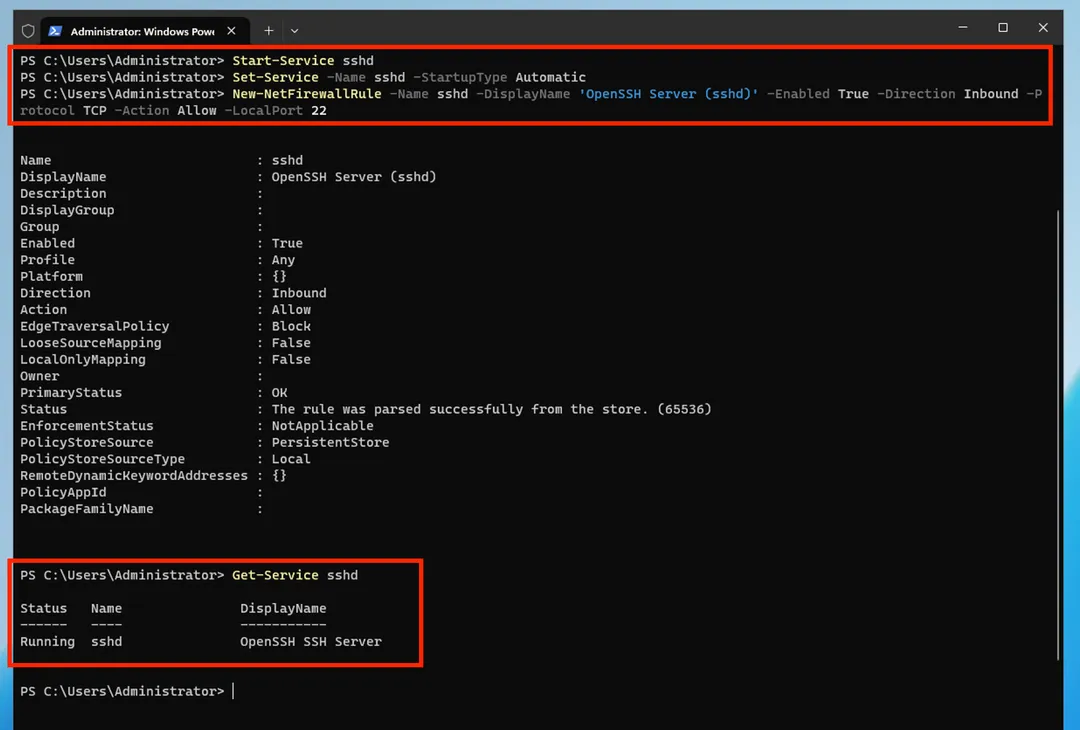
Start-Service sshd
Set-Service -Name sshd -StartupType Automatic
Setting the startup type to Automatic means SSH will come back up on its own after a reboot.
Step 3: Allow SSH through the Windows Firewall
New-NetFirewallRule -Name sshd -DisplayName 'OpenSSH Server (sshd)' -Enabled True -Direction Inbound -Protocol TCP -Action Allow -LocalPort 22You can confirm everything is running with:
Get-Service sshdThe status should read Running.
Step 4: Connect from your computer
The server side is now finished, and nothing below changes depending on which client you use. Pick whichever matches your computer.
On Windows
Using WinSCP (recommended)
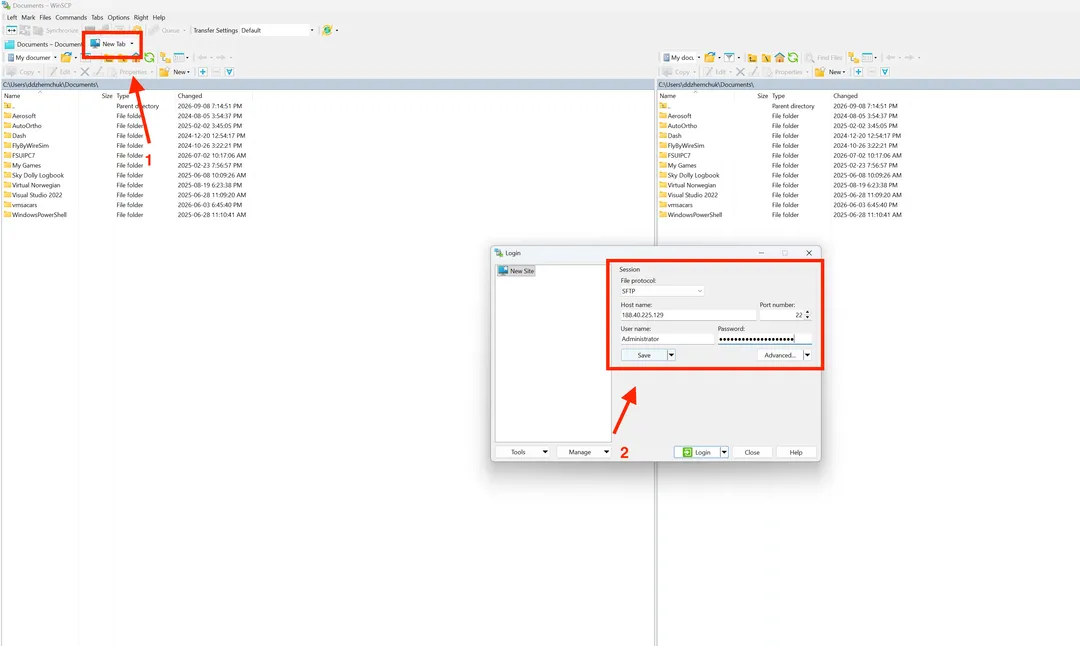
- Download and install WinSCP.
- Create a new session with these settings:
- File protocol: SFTP
- Host name: your server's IP address
- Port number: 22
- User name / Password: your Windows login credentials for the server
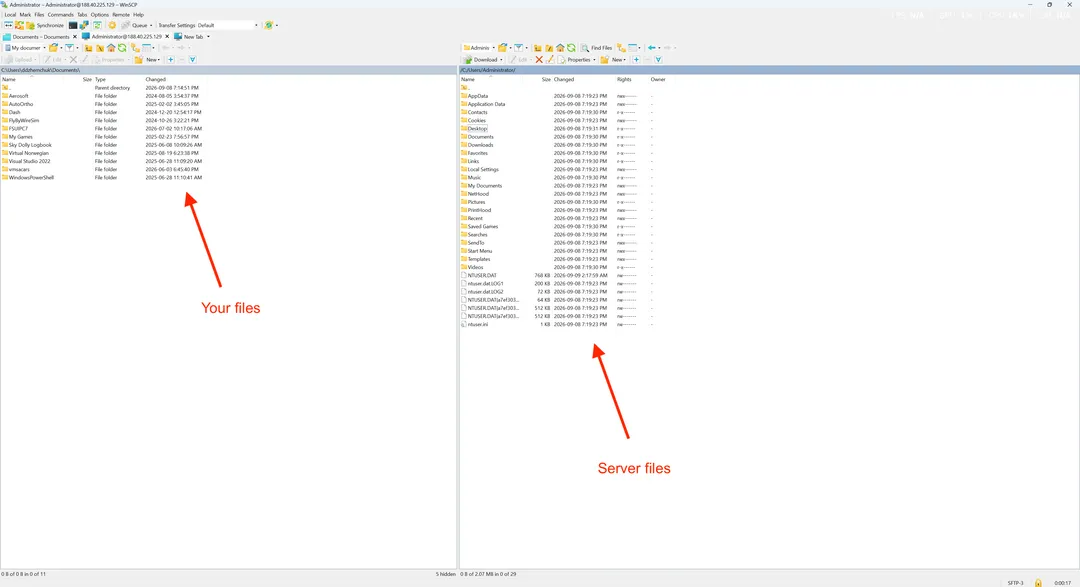
- Click Login. You'll get a two-panel view with your computer on the left and your server on the right. Drag files between them.
WinSCP resumes interrupted transfers automatically, which is why it's the better option for large files.
Using the command line
Windows 10 and 11 include an SSH client, so you can also transfer files without installing anything:
# Download a file from the server to your computer
scp Administrator@YOUR_SERVER_IP:C:/Users/Administrator/Desktop/backup.zip .

# Upload a file from your computer to the server
scp .\report.pdf Administrator@YOUR_SERVER_IP:C:/Users/Administrator/Desktop/
Replace YOUR_SERVER_IP with your server's IP address.
On a Mac
Using Cyberduck (recommended)
Cyberduck is free and is the closest Mac equivalent to WinSCP. FileZilla is another good free option if you prefer it.
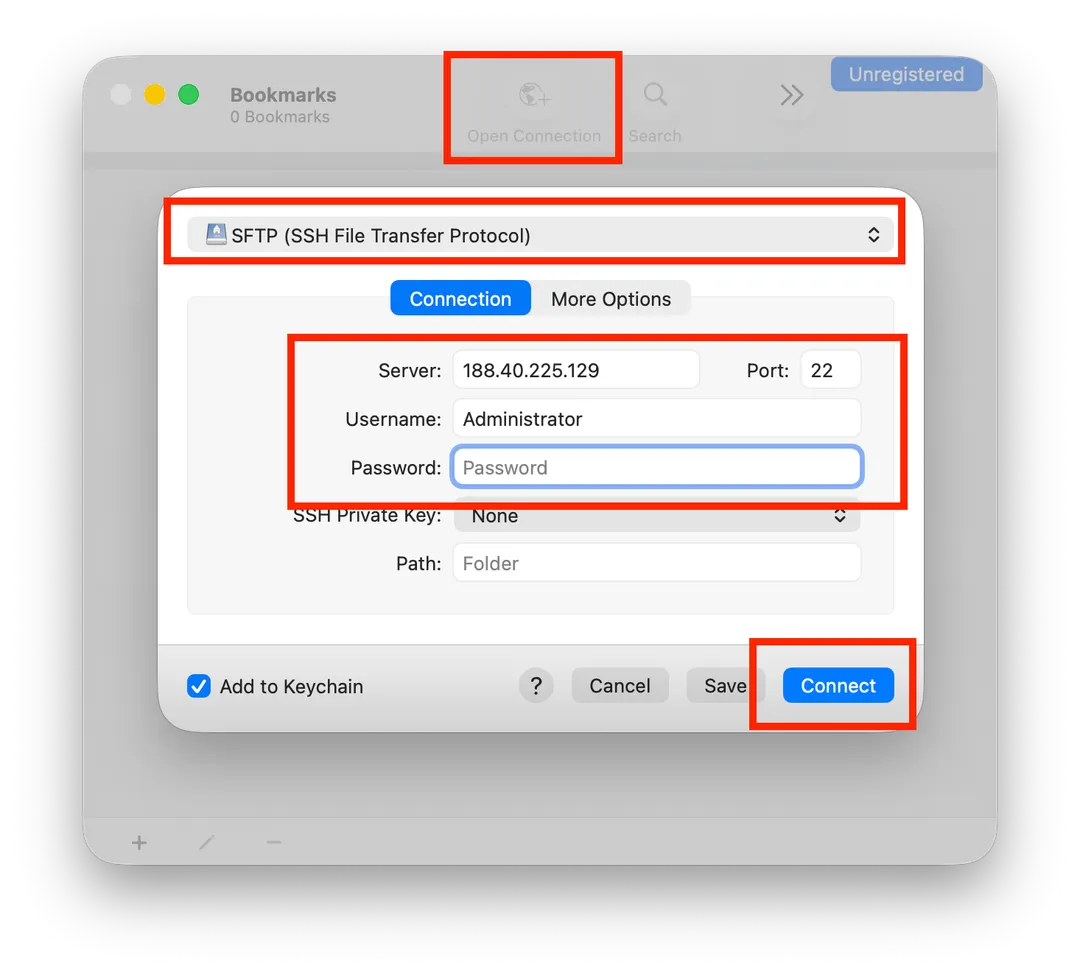
- Install Cyberduck and click Open Connection.
- Choose SFTP (SSH File Transfer Protocol) from the dropdown.
- Enter your server's IP address, port 22, and your Windows login credentials for the server.
- Click Connect, then drag files between the Cyberduck window and Finder.
If you'd rather have the server appear as a drive in Finder, Mountain Duck (from the same developer, paid) does exactly that.
Using Terminal
macOS ships with scp and sftp built in, so you can transfer files without installing anything:
# Download a file from the server to your Mac
scp Administrator@YOUR_SERVER_IP:C:/Users/Administrator/Desktop/backup.zip ~/Downloads/

# Upload a file from your Mac to the server
scp ~/Documents/report.pdf Administrator@YOUR_SERVER_IP:C:/Users/Administrator/Desktop/
A note on paths
Windows paths on the remote side use a drive letter and forward slashes, like C:/Users/Administrator/Desktop/. Backslashes won't work here. If a path contains spaces, wrap the whole remote path in quotes:
scp "Administrator@YOUR_SERVER_IP:C:/Users/Administrator/My Documents/file.zip" ~/Downloads/Which method should I use?
| RDP Drive Redirection | SFTP over SSH | |
|---|---|---|
| Setup time | Under a minute | A few minutes, once |
| Best for | Small files, occasional use | Large files, regular transfers |
| Speed | Moderate | Fast |
| Resumes after a dropped connection | No | Yes, with WinSCP or Cyberduck |
| Needs an open Remote Desktop session | Yes | No |
A good rule of thumb: use drive redirection for documents, configuration files, and anything you're moving once. Use SFTP for backups, media, database dumps, and anything measured in gigabytes.
Dedicated servers generally have more bandwidth available than VPS plans, so the speed difference between the two methods is even more pronounced there. If you're moving large backups regularly on a dedicated server, SFTP is worth setting up once.
A note on security
Port 22 will be reachable from the internet once you enable SSH, and automated login attempts against it are constant and unavoidable. A few precautions go a long way:
- Use a long, unique password for your Windows Administrator account.
- Consider changing SSH to a non-standard port by editing
C:\ProgramData\ssh\sshd_config, then updating your firewall rule to match and restarting the service withRestart-Service sshd. - For the strongest protection, set up SSH key authentication and disable password logins entirely.
- Restrict the firewall rule to your own IP address if you always connect from the same place.
We also recommend against exposing Windows file sharing (SMB, port 445) directly to the internet. It has a long history of being targeted, and either of the two methods above will do the same job far more safely.


